Monday, October 31, 2011

Award-Winning Strike Force Chili

My husband works. A lot.  Like left for work at 2am on Friday and didn't get home until 4pm kind of work.  Like my husband calls me on his way home to greatly increase the amount we talk in a day kind of work.  So when they announced that the winner of the Fall Festival's Chili Cook-off would win a three day DONSA (that's Day Of No Scheduled Activities for all you non-military friends), I said to my FRG leader "sign me up for the company."  Sure, there can only be two entries for the entire company, and I'd be up against eleven other entries.  Sure, I've never actually made chili.  This did not deter me... I was going to win.

After hours searching the internet, videos of chili cooking watched, at least 50 recipes considered from everywhere from America's Test Kitchen to Food Network to googling "award winning chili" and seeing what I could find, I decided on a one-two hook of combining the best from four separate recipes and hoping for the best.  I decided on a Texas-style no beans chili.  And it turned out awesomely.

Thanks to America's Test Kitchen, The Barefoot Contessa, some random website that told me to cook it the night before and http://crazyhorsesghost.hubpages.com/hub/The-Worlds-Best-No-Beans-Chili (reputable, no?) for the resources.  I totally won.  Extra day off for my husband and all of the Headquarters Company.  I know I need it.  I'm sure my husband does, too.  And all the rest of the people?  You're welcome.

I didn't take pictures of every step of the way, so below you will find the "long version" of the recipe.  Sorry.

Award-Winning Strike Force Chili
Serves: 30 testers or 6-8 regular people

1 lb bacon, cut into small pieces (1 inch?)
5 lbs chuck roast trimmed and cut into small cubes (1 inch?)
1 white onion, diced fine
1/4 cup chili powder
1 heaping tbs minced fresh garlic
1 heaping tbs Ancho Chile Pepper
1 tbs cumin (I used roasted cumin)
1 tbs oregano
1tbs smoked paprika
1 tbs kosher salt
1 tbs pepper
(3) 4 oz cans diced green chilis
2.5 cups apple cider (originally called for Corona Beer, although apparently tastes very similar)
(1) 28oz can diced tomato
(1) 6oz can tomato paste
1 oz unsweetened chocolate, chopped finely
*optional, and added later* 2 tbs Jiffy Corn Muffin Mix (yup, the stuff that's $.79).
  • In a dutch oven or other heavy-bottomed pan cook bacon until bacon is slightly crispy (about 8 minutes)
  • Set bacon on paper towels and reserve for later
  • Drain all but 3 tbs bacon fat, then add half of reserved fat back into pan to heat
  • Pat beef cubes with paper towels to dry meat (which is very Julia Childs), and season with additional salt and pepper
  • Add 1/2 (ish) of the beef to the same pan (medium heat) and sear meat on every side (about 8 minutes) NOTE: some people might think "this is ridiculous, I'm just going to add it all."  The reason you don't do this is that the beef on the top gets smoked instead of seared.  That makes it gray, and just not have the right texture.
  • Repeat (without crowding) until all beef is cooked, and set aside
  • Use the SAME PAN without washing or anything, and add onion to pan and cook until soft - making sure to scrape all that "fond" off the bottom, which is seasoning gold
  • Add garlic and spices and cook for 30 seconds (until spices are fragrant)
  • Stir in the rest of the ingredients and bring mixture to a boil
  • Reduce heat to low and simmer, covered, for an hour
  • Skim the fat off the top and continue to simmer, uncovered for 45 minutes, until meat is tender
  • If, at this point, you think the chili is too thin (I thought so), take a ladle of chili out and place it in a bowl.  Add 2 tbs Jiffy Corn Muffin Mix to bowl of chili and stir.  Microwave bowl for about a minute, and add the thickened chili back to the pot. Stir again.
  • Simmer another 10 minutes.  Serve and be happy.
NOTE: I took a break after the initial hour of simmering and refrigerated.  This could be done at any time (it really does blend the flavors well) or, obviously, if you don't have time for this step, you don't have time for this step. :)

Hooray for days off work!

Friday, October 21, 2011

Starbucks Caramel Apple Spice

... I was not going to post today. Today I am supposed to be cleaning my house and putting away my laundry (I don't know about you, but it's the putting away the laundry that always gets me). But since I have had the same "treat" every day for a week, I thought I should share.

It's a Caramel Apple Spice from Starbucks.


Except I've been making them at home. And they are just as good, and don't cost me $2.95 for every. single. one. Thus making me healthy (made from real apples), and frugal (spent less than $10 on enough ingredients to feed my husband's platoon).

Step one: go to Starbucks. See? You're loving this already. Walk up to your nice barista and ask to buy a bottle of Cinnamon Dulce Syrup. I went to the Starbucks on post and even though she had to ask her manager how to ring it up, she sold it to me for $6.95. AN ENTIRE BOTTLE! Less than seven dolars! It's enough to last me for many years - including making this in bulk for parties. (if you want to ask for a pump, feel free. A friend of mine told me she asked when she bought the syrup, and they just gave it to her. A Starbucks pump is 1 tbs according to the interweb, so now you know.)

Step two: assemble drink. Pour about 12 oz of freshly pressed apple cider into a mug. (my second gallon of apple cider for the year is very acid-ey, so I also add about 2 tbs of water. If, however, you love the cider as is, please skip this step). Now add your Cinnamon Dulce Syrup (Starbucks says three pumps for the 12 oz. I add a little less... because you can always add more). Pop it in the microwave until it's the right amount of hot for you (2 minutes is perfect for me).


Now top with whipped cream (optional but yummy) or ice cream if it's a little warmer that day (again, optional, but why would you miss it?). And top that with some caramel sauce.

It is the perfect treat to reward yourself for raking leaves, walking the dog, or getting ready to put the laundry away. I deserve a treat for getting ready, don't I?

Wednesday, October 19, 2011

Cranberry Monte Cristo Sandwich

It's fall. For anyone who knows me, you will know that this is the goal of the entire year: get to fall. All the best things happen in fall: sweaters, hiking, jackets, fresh bread, Thanksgiving. It's the most wonderful time of the year. Don't get me wrong, Christmas is fun, but Fall is the season of magic.

As one of the many great things to happen this fall, is my invitation to join the HouseHold6 Cooking Club. For those of you less familiar with "the army," if your call-sign is 6, that means you are in charge. And since I am in charge of my Household, that's me. That could be you, too. Start demanding your spouse/children use it on the phone. Maybe it'll make your day.

As part of the cooking club, we have a monthly challenge! This month's challenge was:

Orange, brown and rust are the colors of Fall. Create a dish using these colors. You can only use one of the colors as a non food, ie a rust colored plate to hold the dish. You can incorporate other colors but these 3 colors have to be the dominant colors that you feature.

When I received this email, the first thing I thought was "cranberries are red, and red is a rusty color, and I want to eat cranberries." Follow that up by my love of the crisp browned edges of grilling sandwiches and the orangey color of a good Challah Bread, and we've got a color pallet. And even though I used Italian bread since the TN/KY area is low on Challah bread, it still worked out pretty famously. Here we go!


I love the Monte Cristo Sandwich. It is so many things that I love (french toast, grilled ham and cheese, jam) all put together into one delicious sandwich. And the thing that shocked me was how much I liked this sandwich when I put it together. I was all ready for "eeh, this is what I would change next time" and instead got "must stop eating long enough to take a picture of the sandwich" because it was that good.


Step the first: make a cranberry orange jam. If you're not up for this, just take some of the canned whole cranberry stuff and throw some orange zest in there. However, if you'd like to make a jam to put on this sandwich, toast (like I did this morning), baked chicken and anything else short of chocolate cake, it is easy, and requires almost no effort on your part. First just wash a bag of fresh cranberries (or take a bag out of the freezer), and put them in a pan with the zest and juice of one orange.

Add 3/4 to 1 cup of sugar (my orange was bi-tter, so I used a little more), and a cup of water, and 1/2 tsp of pumpkin pie spice (or 1/4 each cinnamin and nutmeg) and stick it on medium to boil away. After your initial stir, you really don't need to do much. Just let it simmer there for about 10 minutes on medium (until you stop hearing the cranberries pop). Turn the heat down and taste (this is where I added the rest of the sugar, since it was SUPER-tart, and I was looking for slightly-tart). Simmer on medium-low for another 5-10 minutes (with stirring) until sauce thickens a bit. Set aside to cool.

Step the second: prep the sandwiches. I like laying all of my bread on a tray and putting them together at the same time. On one side of the bread, I spread the cooled (or in my case "mostly cooled) cranberry jam of awesome.

On the other, make a mixture of mayo and mustard (I like to use spicy mustard, but Dijon would work well too)

Then layer cheese, turkey and ham... and another slice of cheese because it's tasty. Now put the two sides together, squish them together a little bit, and wrap tightly for 30 minutes-ish to let flavors combine, and the food stick together so you don't end up with half of your sandwich falling off.


As you can see... I have a picky eater in my family. He doesn't like "fancy food." So I also made this dish using regular, everyday, sandwich bread. If you are using regular, everyday, sandwich bread cut the crusts off before you wrap them. This is not because my picky eater is 3, but because it helps create a seal along the edges (which is helpful for not getting egg in the middle).

Step the third: french toast. Combine eggs, milk (I ended up using a small amount of heavy cream I had in my fridge) and some pumpkin pie spice (or cinnamon and nutmeg)...


look how pretty that nutmeg is when you use it fresh...

Anyway, just whisk those together just like you're making french toast in home ec. Take your sandwiches out of their little wraps-of-flavor and dip them in the egg mixture on both sides, and place them on a pre-heated and buttered grill or pan. Keep the temperature low (a little less than medium?) and cover so that the heat permiates the cheese and melts everything - just like making a grilled cheese sandwich. After 2-3 minutes, flip to the other side and do it again.

Step the fourth: eating. Cut sandwich on the bias, and sprinkle with powdered sugar (if you remember before you eat half of it, unlike i did.)


Voila! It's fall colors, it tastes like fall and Christmas thanks to the cranberries, and you have a new guilty pleasure. Because, really, it looks like a million bucks but is surprisingly easy to put together. Enjoy!

Cranberry Monte Cristo Sandwich
3 eggs
1/4 c milk or cream
1/2 tsp pumpkin pie spice
Powdered Sugar (optional)

For each sandwich:
2 slices challah (ideal) or Italian bread (or sandwich for picky eaters)
2 slices gouda (or swiss for picky eaters)
2 thin slices turkey
2 thin slices ham
Mayo/spicy mustard to taste
Cranberry orange jam to taste (recipe below)

Lay out bread, smearing mustard/mayo on one side, and cranberry orange jam on the other. Layer cheese, meat and cheese (so the cheese can "glue" the sandwich together on both sides). Put top on sandwiches, and smoosh them down lightly. (Cut off crusts if using sandwich bread to create a seal.) Wrap tightly and store for at least 30 minutes in refrigerator.

Combine eggs, milk and pumpkin pie spice in 8x8 baking dish or pie pan and wisk together. Dip both sides of rested sandwich in egg mixture and place on a medium-hot (buttered) grill. Tent or cover to ensure cheese melts, and cook 2-3 minutes on each side. Serve topped with powdered sugar (optional).

Cranberry Orange Jam

1 bag of freshly washed cranberries (frozen work well, too)
Zest and Juice of one orange
3/4 to 1 cup sugar
1/2 tsp pumpkin pie spice
1 cup water

Combine all ingredients in a saucepan and let sit, on medium, for about 10 minutes (or until the cranberries finish "popping"). Turn the heat down and stir regularly for another 5-10 minutes as the sauce thickens. Let cool.

Thursday, October 6, 2011

BoB Soup

As an Army Wife you meet lots of people. Many of whom are lovely, and some of whom make you wish they would leave you alone forever. While we were living in Georgia, we lived next to a very nice Korean woman named MinJong.  She was lovely and was interested in learning more about American-cooking, so we made a cooking deal.  I am very sad to say that although I faithfully taught her to make a chocolate cake, we didn't make an appointment for her to teach me egg rolls. Which is sad because they were so yummy.  (this is because, as an Army Wife, you get used to everyone moving all the time, and she moved before we could get together...)

One afternoon, MinJong and I were chatting and it came up that my father was a Canadian citizen. She replied: "Ooh, that explains why you look so foreign... I mean beautiful." Right.  Obviously both true, but obviously hilarious as well.

The funny thing is that Canada is, for the most part, the same. But with better candy. And more colorful dollar bills. And an entirely different heathcare approach (neither here nor there). However, since my father is Canadian, and many of the first years of my parent's marriage was spent there, my mother has picked up many "Canadian" things to cook. Most of these are heavenly (just wait for the Christmas posts!).  So, in a word, think of this easy, healthy go-to soup as foreign... I mean flavorful.  Right.  Obviously both true.

This is one of my favorite weeknight (or even weeknight with guests) meals, and I have been craving it for weeks now. Because it's fall. And fall = soups. This recipe comes from a line of cookbooks called The Best of Bridge. And although it was originally called "Hamburger Soup," we now refer to it as "BoB Soup" (from Best of Bridge) because I no longer use ground beef in the making of it. :)


BoB soup is... warm - yes! tasty - yes! impressive - i happen to think 94% of all homemade soups are impressive, so yes! But the best part is, it's made of everyday ingredients. And somehow, you mix them all together and they equal just a warm bowl of goodness you will crave when the wind starts to turn a bit cold.

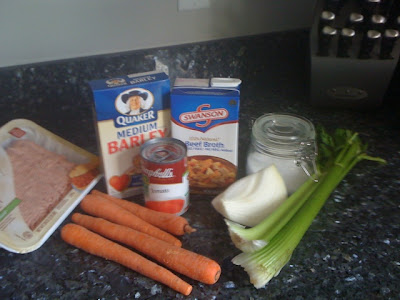
So, you compile the ingredients.

You may notice that I have forgotten diced tomatoes in this picture.  This is because, while I was at the store purchasing said "everyday items" I was on the phone with my mother.  Who told me that I was wrong and did not need diced tomatoes.  As it turns out, she was wrong.  As it further turns out, you can used your RoTel Diced Tomatoes with Cilantro in this recipe in a pinch.

You may also notice that instead of using a "medium sized onion" there is only 1/4 of an onion in this picture.  That is because the onion in question looked like this:


And THAT, friends, is an onion as large as my head.  Tell you what, I had a fun time at the farmer's market this weekend...

So just brown up your meat (I prefer turkey-burger) and onion (onion diced small).  And put a little salt or season salt in (because you should flavor every layer).  I used my fabulous cast iron pot to cook these in today, but my mother always just browned these two in a pan, and then transfered to a large stock pot.  So do what makes you happy.


And while the meat is browning and the onions are getting nice and tasty, chop up your carrots (I prefer "triangle" shape for this) and celery, so you have small bits of veggies. 

When your meat is sufficiently browned, drain the fat.  Now plop it back in a pot, and add everything else.  Your celery, carrots, diced tomatoes (no matter what your mother tells you), thyme, salt, bay leaf, water, pepper, barley, tomato soup (yup, just the concentrated stuff in the can) and beef broth. 


Obviously you could substitute another broth if you felt so inclined.  The original, Canadian, recipe calls for beef consume, which is not readily available where I live.  If you can find beef consume (it'll be near the canned soups, or perhaps the "broth" section), please use it.  I live in Kentucky, so I'm happy to find broth.  Either one entire box, or three 10.5 oz cans worth.

Also, if you are not a fan of barley, or just don't want to use it, feel free to use brown rice instead.  Or white rice if you feel so inclined.  I bought barley for this very occasion.  Not sure what else I'm going to do with it, but I love the texture in all kinds of soups, so I assume I'll do that.

Now bring the soup to a boil on medium heat, and place the lid kindof skewompas on top.  Now take it down to a slow simmer and boil away for at least an hour, preferably two.  But if it's longer, there are no worries.

slightly skewompas lid... in case it wasn't "english"

This soup is great re-heated, or even frozen for later.  But it is pretty darn great for right now.  mmm...  (Don't forget to take the bay leaf out...)


BoB (Hamburger) Soup
1 1/2 lb ground turkey (or ground beef)
1 medium onion, chopped
1 28oz can diced tomatoes
2 cups water
3 10.5 oz cans, or one 32oz box of beef broth
1 can tomato soup
4 carrots chopped fine
3 stalks of celery chopped fine
1/4 cup barley or brown rice
1/2 tsp thyme
Salt and Pepper (to taste)
1 bay leaf

Brown meat and onions
Drain well.
Combine all other ingredients in a large pot and simmer for 2 hours.
Take bay leaf out.
Serve.