Wednesday, December 21, 2011

Fudge Cookies

Christmas is a time for traditions, a time for family. A time for peace and blessings and thanksgiving... and presents. Let's go ahead and put it on the table. I'm all for putting Christ in Christmas (yes!), but I'm also for giving and recieving gifts. Especially from Santa. And, as I have said before, there are things Santa needs or he will not stop.
List of things Santa loves that I firmly believe I need to leave out for him (and have for many many years) includes:
Milk
2 carrots
2 orange sticks
2-4 fudge cookies

What? What are fudge cookies? Ooh just a little thing we whip up. You know, to activate the Santa GPS. And your taste-buds. And rave reviews. It's chocolatey, it's moist and chewey. And it is delicious.


And this from a woman who claims to "not really like chocolate that much." However, I just think I don't like low quality chocolate that much. A Hershey's Bar? Please... I have much better things to be doing with my calories. Like eating almost anything with a ton of butter on it. But a nice, non-overpowering chocolate can really hit the spot. And bring the fat man a-coming.

And this hits the spot. And is easy to boot. (some things I'm happy to spend hours on. cookies, as I may have already blogged about, are not one of these things.) Plus... FIVE ingredients. Just five! Or six... but that one is optional.

pretend like there is flour in this picture.

Just heat-up your double boiler (or you can use a nice thick pan and keep the heat low) and slowly melt 9oz of semi-sweet chocolate chips, and 2tbs butter. Don't try this with milk chocolate chips even if you totally like them better and think semi-sweet taste pretty nasty all by themselves (trust me). Nope, go for the semi-sweet.


Once it gets good and melty take the double boiler off the heat and stir in one can of sweetened condensed milk which, incidentally, is climbing the charts on my favorite things list.


Once the milk has integrated into the chocolate, add vanilla, a cup of flour and some nuts (if you're interested). We generally go for half with and half without at our house. And although the recipe I found somewhere claiming to be the "original" calls for walnuts, we have used pecans as long as anyone can remember.
Anyway, that's it. No more ingredients. No more time. Now just use two tablespoons and place small globs on your pre-greased baking sheet.


One batch will generally make about two and a half dozen, according to my mother. About 18 according to me (I have no will-power with cookie portioning. Large cookies for everyone!). Although I do suggest a rather smallish glob, if you can find the will-power.


Bake them at 350 for 10-12 minutes (please, for the love of elves, do not overbake this one). Cool, and serve. You can serve these to anyone - choco-holics, chocolate-sometimesers (not a word), your husband's platoon (rave reviews), and, most importantly, the big guy himself.

A note on beautiful cookies: if you are making more than one batch (which I suggest you do), start making the second batch when you're half way through cooking your first. Making a double batch of these just doesn't turn out right... on top of which, letting the dough get cool long enough to cook cookies and cookies before you leads to a less-attractive mess.


Fudge Cookies
aka "Cookies that Santa likes"
2 tbs butter
9 oz semi-sweet chocolate chips
1 can sweetened condensed milk
1 tbs vanilla
1 cup flour
1 cup chopped pecans (optional)
Melt chocolate and butter in a double boiler. When melted, take off heat and add milk - stir until integrated. Add vanilla, flour and nuts (if using) and mix well. Bake at 350 for 10-12 minutes. Enjoy presents from Santa.

Friday, November 18, 2011

Cranberry Apple Salad

Happy Thanksgiving!

Thanksgiving is my favorite holiday. It's a great time to cook and hang out with your family, you don't have weeks leading up to it with stress and who gets what present... it's just a magical time to sit down with your family, eat some great food, and be thankful. Plus, as a bonus, the next day you can start thinking about putting up decorations for Christmas. Win/Win/Win.

This will be my first Thanksgiving at my in-laws house. I am happy we live close enough to them to have this opportunity, and happy we have family to share this day with... but I am a little hesitant. After all, what are holidays but years and years of traditions you expect to be upheld. And what is another family, but years and years of their own traditions. However, I did ask if I could make this dish.  This is food from "my part of the world," and I am bringing it to wherever I am.  In this case... it's the mid-west.


It's a little tart, it's sweet, and it's made of fruit so we serve it during the meal instead of during dessert (even though there are cookies and whipped cream and something resembling a frosting in there). It is Cranberry Apple Salad, and I have been in charge of making this for the holidays for about 10 years. I wouldn't want a holiday without it.  Where it comes from? I'm not sure.  But I know where it's going (and if it has anything to do with the number of people who ask for this recipe, it's everywhere).  And also in my mouth.


One of the many things I like about this salad is that you only have to use one food processor, and you only have to clean it once. It took me a couple of years to figure out the right order, so follow along!

Step one: drain your pineapple (and keep the juice). Let it drain while you're going about doing the rest of this... it needs to drain for a terrifically long time, so start now.


Alright, step two: crush a box of Nilla Wafers in your food processor until they are a "crumb." Put them aside for later.


Next wash the cranberries, and make sure you've got only good-ones there. (I'm not sure it matters in the long-haul, but I am pretty picky about my cranberries.) Now chop them up (I generally do this in two batches, so they don't get too small or juicy) and put them in a mixing bowl. Repeat with slices of apple.


Combine chopped cranberries, chopped apples, well-drained pineapple, marshmallows and sugar together and let it hang out for a bit in the bowl. Maybe an hour. Maybe overnight.

While you're waiting for that to meld (so you can re-drain it... because nobody likes a soupy salad), combine 2/3 of your crushed Nilla Wafers and a couple of tbs of butter. Press it into the bottom of a glass-looking (or actual glass, whatever) cake pan.


Now, back to the processor, put a package of softened cream cheese and a couple of tablespoons of powdered sugar. While the food processor is running, add about 1/4 cup of the reserved pineapple juice (feel free to drink the rest). You're looking for a thin-consistancy frosting-like layer. Now add it on top of the crumb base. This is starting to look good.

If your cranberry mixture is looking soupy, feel free to drain it again (this is where I generally start on day-two. Either way, this stuff needs to wait overnight.). Add it on top of the "white" frosting-like layer and spread out evenly.


Now whip some cream (and add some vanilla and powdered sugar), and add it to the top. Top this ALL off with that 1/3 reserved nilla wafers. And now you have got the most delicious and festive dish on any table. Eat it with dinner. Eat it with dessert. Eat it the next morning for breakfast (it is made of fruit...). Enjoy and Happy Thanksgiving.


Cranberry Apple Salad

Crumb Layer:
box of Nilla Wafers
3 tbs melted butter

White Layer:
package of cream cheese (softened)
2 tbs. powdered sugar
1/4 cup pineapple juice

Cranberry Layer:
1 cup crushed pineapple (well-drained - reserve liquid)
2 cups cranberries
3 medium apples (any kind, but preferably firm and red)
1 cup miniature marshmallows
1 cup sugar


Whipped Cream

  • Crush Nilla Wafers and set aside.
  • Process cranberries and apples (in batches to limit "soupyness") until medium/fine chopped and combine with (drained) pineapple, marshmallows and sugar. Set mixture aside.
  • In the same processor, combine cream cheese, powdered sugar and drizzle in pineapple juice until thin frosting-like consistancy.
  • Combine 2/3 of the crushed Nilla Wafers and butter - press into cake pan to form crust.
  • Cover crust with white cream cheese layer.
  • Add cranberry layer to the cake pan (making sure it is well-drained).
  • Refrigerate overnight. (note: you can refrigerate the cranberry layer separately and drain the next day if desired.)
  • Add sweetened whipped cream and remaining cookie crumb to salad and serve.

Thursday, November 3, 2011

Oatmeal Raisin Neiman Marcus Cookies

Look what I found sitting in my drafts folder, just waiting to be published... COOKIES!

I do not come from "cookie" people. When my mother wants to make a treat, she makes a cake. I have grown-up that way, and can understand why she is so anti-cookies - you have to sit around all day just putting cookies in the oven, taking cookies out of the oven. All day.** That's it. So I don't make cookies very much.

**note: it doesn't actually take all day to switch cookies in and out. But you have got to agree that it feels like it takes all day. Honestly, I just stand by the stove reading a book for an hour...

There are two exceptions to my "no cookie" rule: the cookies that Santa likes (so I must make them or Christmas will not come), and the cookies my husband likes (so I must make them for him and his guys when he goes into the field). These are the cookies my husband likes. And they are exceptional cookies. I wouldn't spend all day putting cookies into the oven and taking them out again if I didn't think they were worth it - and they are worth it. So says me, so says my husband, and so say all the people I give them to (of which there are many, because last time I made these cookies, there were about 85 of them in one batch).

A quick aside: I modified a cookie dough called "Neiman Marcus Cookies" to create this. Apparently this was an Internet scam or something, because that whole story about "I asked Neiman Marcus for their cookie recipe, and they charged my credit card $50,000" is untrue. In fact, until recently, Neiman Marcus didn't even make cookies. There. Rumors dispelled. Moving on.

Making these cookies is a cinch - you don't even need a mixer. Mostly because once I tried using a mixer, and may or may not have burned the motor out. So probably don't use a mixer. (if you have a KitchenAid, and desire, I am sure you could use that. But since I have none, I shall not.)

Step one: take 5 cups of Oatmeal (not instant or fast-cooking) and either pulse a few times in a food processor (like I did with this stylish model almost as old as I am), or crush well with a rolling-pin. If you have a food processor, just pulse it a few times. You're looking for a fine powder.


Step 2: Now cream together the butter and the sugars and the eggs (the wet ingredients. I always find it so interesting that sugar is a wet ingredient...).

Step 3: Dry Team! Add the flour, oatmeal powder, salt, baking powder, baking soda together and stir.  Now add about 3/4 of a 24 oz container of raisins (you could add more, but I promise there are already plenty!) and a toffee-containing chocolate bar of your choosing - pre broken, and add them all together.

I used to use a Symphony bar for this (with almonds and toffee chips), but started looking for a non-almond option when my sister became allergic.

Milka are infinately better.  Not just because of their lack of almonds.  They are just so. much. better.  It's Europe's #1 chocolate bar.  Europe doesn't lie about things like chocolate bars...

Yum.  (and, yes, you can find them where you are.  I found these at a Wal-Mart in nowheresville Kentucky.)

Now roll the dough into balls and place about 2 inches apart on a greased cookie sheet, and cook them. According to the original recipe, it makes 112 cookies. I've always found it makes between 80-90. Either way, it makes a lot of cookies. And trust me when I say... this is not too many. Bake them all.


This cookie is perfect. Chewey without being cakey. Moist without being... greasy? Make them for your friends. Make them for your family. Make them for yourself.  Rated 10/10 by my husband's platoon, and 10/10 by me.

Oatmeal Raisin Neiman Marcus Cookies
375 degrees, 10 minutes per batch.  Makes 80-100 cookies.

5 cups oatmeal - blended until fine
2 cups butter
2 cups white sugar
2 cups brown sugar
4 eggs
~18oz raisins
1 tsp salt
2 tsp vanilla
2 tsp baking powder
2 tsp baking soda
4 cups all-purpose flour
1 8 oz chocolate bar - smashed

Measure oatmeal and crush until it reaches a fine powder.  Set aside.

Cream butter, sugars and eggs together.

Add flour, sale, baking powder and soda to oatmeal and mix.

Combine butter/sugar mixture with flour mixture.  Add chocolate bar and raisins.

Roll into balls and place 2 inches apart on a greased cookie sheet.

Bake and enjoy my favorite cookie.  It's got that oatmeal raisin goodness with nice hints of chocolate (and a dash of "what is that?" if you use the toffee-included chocolate bar).


Monday, October 31, 2011

Award-Winning Strike Force Chili

My husband works. A lot.  Like left for work at 2am on Friday and didn't get home until 4pm kind of work.  Like my husband calls me on his way home to greatly increase the amount we talk in a day kind of work.  So when they announced that the winner of the Fall Festival's Chili Cook-off would win a three day DONSA (that's Day Of No Scheduled Activities for all you non-military friends), I said to my FRG leader "sign me up for the company."  Sure, there can only be two entries for the entire company, and I'd be up against eleven other entries.  Sure, I've never actually made chili.  This did not deter me... I was going to win.

After hours searching the internet, videos of chili cooking watched, at least 50 recipes considered from everywhere from America's Test Kitchen to Food Network to googling "award winning chili" and seeing what I could find, I decided on a one-two hook of combining the best from four separate recipes and hoping for the best.  I decided on a Texas-style no beans chili.  And it turned out awesomely.

Thanks to America's Test Kitchen, The Barefoot Contessa, some random website that told me to cook it the night before and http://crazyhorsesghost.hubpages.com/hub/The-Worlds-Best-No-Beans-Chili (reputable, no?) for the resources.  I totally won.  Extra day off for my husband and all of the Headquarters Company.  I know I need it.  I'm sure my husband does, too.  And all the rest of the people?  You're welcome.

I didn't take pictures of every step of the way, so below you will find the "long version" of the recipe.  Sorry.

Award-Winning Strike Force Chili
Serves: 30 testers or 6-8 regular people

1 lb bacon, cut into small pieces (1 inch?)
5 lbs chuck roast trimmed and cut into small cubes (1 inch?)
1 white onion, diced fine
1/4 cup chili powder
1 heaping tbs minced fresh garlic
1 heaping tbs Ancho Chile Pepper
1 tbs cumin (I used roasted cumin)
1 tbs oregano
1tbs smoked paprika
1 tbs kosher salt
1 tbs pepper
(3) 4 oz cans diced green chilis
2.5 cups apple cider (originally called for Corona Beer, although apparently tastes very similar)
(1) 28oz can diced tomato
(1) 6oz can tomato paste
1 oz unsweetened chocolate, chopped finely
*optional, and added later* 2 tbs Jiffy Corn Muffin Mix (yup, the stuff that's $.79).
  • In a dutch oven or other heavy-bottomed pan cook bacon until bacon is slightly crispy (about 8 minutes)
  • Set bacon on paper towels and reserve for later
  • Drain all but 3 tbs bacon fat, then add half of reserved fat back into pan to heat
  • Pat beef cubes with paper towels to dry meat (which is very Julia Childs), and season with additional salt and pepper
  • Add 1/2 (ish) of the beef to the same pan (medium heat) and sear meat on every side (about 8 minutes) NOTE: some people might think "this is ridiculous, I'm just going to add it all."  The reason you don't do this is that the beef on the top gets smoked instead of seared.  That makes it gray, and just not have the right texture.
  • Repeat (without crowding) until all beef is cooked, and set aside
  • Use the SAME PAN without washing or anything, and add onion to pan and cook until soft - making sure to scrape all that "fond" off the bottom, which is seasoning gold
  • Add garlic and spices and cook for 30 seconds (until spices are fragrant)
  • Stir in the rest of the ingredients and bring mixture to a boil
  • Reduce heat to low and simmer, covered, for an hour
  • Skim the fat off the top and continue to simmer, uncovered for 45 minutes, until meat is tender
  • If, at this point, you think the chili is too thin (I thought so), take a ladle of chili out and place it in a bowl.  Add 2 tbs Jiffy Corn Muffin Mix to bowl of chili and stir.  Microwave bowl for about a minute, and add the thickened chili back to the pot. Stir again.
  • Simmer another 10 minutes.  Serve and be happy.
NOTE: I took a break after the initial hour of simmering and refrigerated.  This could be done at any time (it really does blend the flavors well) or, obviously, if you don't have time for this step, you don't have time for this step. :)

Hooray for days off work!

Friday, October 21, 2011

Starbucks Caramel Apple Spice

... I was not going to post today. Today I am supposed to be cleaning my house and putting away my laundry (I don't know about you, but it's the putting away the laundry that always gets me). But since I have had the same "treat" every day for a week, I thought I should share.

It's a Caramel Apple Spice from Starbucks.


Except I've been making them at home. And they are just as good, and don't cost me $2.95 for every. single. one. Thus making me healthy (made from real apples), and frugal (spent less than $10 on enough ingredients to feed my husband's platoon).

Step one: go to Starbucks. See? You're loving this already. Walk up to your nice barista and ask to buy a bottle of Cinnamon Dulce Syrup. I went to the Starbucks on post and even though she had to ask her manager how to ring it up, she sold it to me for $6.95. AN ENTIRE BOTTLE! Less than seven dolars! It's enough to last me for many years - including making this in bulk for parties. (if you want to ask for a pump, feel free. A friend of mine told me she asked when she bought the syrup, and they just gave it to her. A Starbucks pump is 1 tbs according to the interweb, so now you know.)

Step two: assemble drink. Pour about 12 oz of freshly pressed apple cider into a mug. (my second gallon of apple cider for the year is very acid-ey, so I also add about 2 tbs of water. If, however, you love the cider as is, please skip this step). Now add your Cinnamon Dulce Syrup (Starbucks says three pumps for the 12 oz. I add a little less... because you can always add more). Pop it in the microwave until it's the right amount of hot for you (2 minutes is perfect for me).


Now top with whipped cream (optional but yummy) or ice cream if it's a little warmer that day (again, optional, but why would you miss it?). And top that with some caramel sauce.

It is the perfect treat to reward yourself for raking leaves, walking the dog, or getting ready to put the laundry away. I deserve a treat for getting ready, don't I?

Wednesday, October 19, 2011

Cranberry Monte Cristo Sandwich

It's fall. For anyone who knows me, you will know that this is the goal of the entire year: get to fall. All the best things happen in fall: sweaters, hiking, jackets, fresh bread, Thanksgiving. It's the most wonderful time of the year. Don't get me wrong, Christmas is fun, but Fall is the season of magic.

As one of the many great things to happen this fall, is my invitation to join the HouseHold6 Cooking Club. For those of you less familiar with "the army," if your call-sign is 6, that means you are in charge. And since I am in charge of my Household, that's me. That could be you, too. Start demanding your spouse/children use it on the phone. Maybe it'll make your day.

As part of the cooking club, we have a monthly challenge! This month's challenge was:

Orange, brown and rust are the colors of Fall. Create a dish using these colors. You can only use one of the colors as a non food, ie a rust colored plate to hold the dish. You can incorporate other colors but these 3 colors have to be the dominant colors that you feature.

When I received this email, the first thing I thought was "cranberries are red, and red is a rusty color, and I want to eat cranberries." Follow that up by my love of the crisp browned edges of grilling sandwiches and the orangey color of a good Challah Bread, and we've got a color pallet. And even though I used Italian bread since the TN/KY area is low on Challah bread, it still worked out pretty famously. Here we go!


I love the Monte Cristo Sandwich. It is so many things that I love (french toast, grilled ham and cheese, jam) all put together into one delicious sandwich. And the thing that shocked me was how much I liked this sandwich when I put it together. I was all ready for "eeh, this is what I would change next time" and instead got "must stop eating long enough to take a picture of the sandwich" because it was that good.


Step the first: make a cranberry orange jam. If you're not up for this, just take some of the canned whole cranberry stuff and throw some orange zest in there. However, if you'd like to make a jam to put on this sandwich, toast (like I did this morning), baked chicken and anything else short of chocolate cake, it is easy, and requires almost no effort on your part. First just wash a bag of fresh cranberries (or take a bag out of the freezer), and put them in a pan with the zest and juice of one orange.

Add 3/4 to 1 cup of sugar (my orange was bi-tter, so I used a little more), and a cup of water, and 1/2 tsp of pumpkin pie spice (or 1/4 each cinnamin and nutmeg) and stick it on medium to boil away. After your initial stir, you really don't need to do much. Just let it simmer there for about 10 minutes on medium (until you stop hearing the cranberries pop). Turn the heat down and taste (this is where I added the rest of the sugar, since it was SUPER-tart, and I was looking for slightly-tart). Simmer on medium-low for another 5-10 minutes (with stirring) until sauce thickens a bit. Set aside to cool.

Step the second: prep the sandwiches. I like laying all of my bread on a tray and putting them together at the same time. On one side of the bread, I spread the cooled (or in my case "mostly cooled) cranberry jam of awesome.

On the other, make a mixture of mayo and mustard (I like to use spicy mustard, but Dijon would work well too)

Then layer cheese, turkey and ham... and another slice of cheese because it's tasty. Now put the two sides together, squish them together a little bit, and wrap tightly for 30 minutes-ish to let flavors combine, and the food stick together so you don't end up with half of your sandwich falling off.


As you can see... I have a picky eater in my family. He doesn't like "fancy food." So I also made this dish using regular, everyday, sandwich bread. If you are using regular, everyday, sandwich bread cut the crusts off before you wrap them. This is not because my picky eater is 3, but because it helps create a seal along the edges (which is helpful for not getting egg in the middle).

Step the third: french toast. Combine eggs, milk (I ended up using a small amount of heavy cream I had in my fridge) and some pumpkin pie spice (or cinnamon and nutmeg)...


look how pretty that nutmeg is when you use it fresh...

Anyway, just whisk those together just like you're making french toast in home ec. Take your sandwiches out of their little wraps-of-flavor and dip them in the egg mixture on both sides, and place them on a pre-heated and buttered grill or pan. Keep the temperature low (a little less than medium?) and cover so that the heat permiates the cheese and melts everything - just like making a grilled cheese sandwich. After 2-3 minutes, flip to the other side and do it again.

Step the fourth: eating. Cut sandwich on the bias, and sprinkle with powdered sugar (if you remember before you eat half of it, unlike i did.)


Voila! It's fall colors, it tastes like fall and Christmas thanks to the cranberries, and you have a new guilty pleasure. Because, really, it looks like a million bucks but is surprisingly easy to put together. Enjoy!

Cranberry Monte Cristo Sandwich
3 eggs
1/4 c milk or cream
1/2 tsp pumpkin pie spice
Powdered Sugar (optional)

For each sandwich:
2 slices challah (ideal) or Italian bread (or sandwich for picky eaters)
2 slices gouda (or swiss for picky eaters)
2 thin slices turkey
2 thin slices ham
Mayo/spicy mustard to taste
Cranberry orange jam to taste (recipe below)

Lay out bread, smearing mustard/mayo on one side, and cranberry orange jam on the other. Layer cheese, meat and cheese (so the cheese can "glue" the sandwich together on both sides). Put top on sandwiches, and smoosh them down lightly. (Cut off crusts if using sandwich bread to create a seal.) Wrap tightly and store for at least 30 minutes in refrigerator.

Combine eggs, milk and pumpkin pie spice in 8x8 baking dish or pie pan and wisk together. Dip both sides of rested sandwich in egg mixture and place on a medium-hot (buttered) grill. Tent or cover to ensure cheese melts, and cook 2-3 minutes on each side. Serve topped with powdered sugar (optional).

Cranberry Orange Jam

1 bag of freshly washed cranberries (frozen work well, too)
Zest and Juice of one orange
3/4 to 1 cup sugar
1/2 tsp pumpkin pie spice
1 cup water

Combine all ingredients in a saucepan and let sit, on medium, for about 10 minutes (or until the cranberries finish "popping"). Turn the heat down and stir regularly for another 5-10 minutes as the sauce thickens. Let cool.

Thursday, October 6, 2011

BoB Soup

As an Army Wife you meet lots of people. Many of whom are lovely, and some of whom make you wish they would leave you alone forever. While we were living in Georgia, we lived next to a very nice Korean woman named MinJong.  She was lovely and was interested in learning more about American-cooking, so we made a cooking deal.  I am very sad to say that although I faithfully taught her to make a chocolate cake, we didn't make an appointment for her to teach me egg rolls. Which is sad because they were so yummy.  (this is because, as an Army Wife, you get used to everyone moving all the time, and she moved before we could get together...)

One afternoon, MinJong and I were chatting and it came up that my father was a Canadian citizen. She replied: "Ooh, that explains why you look so foreign... I mean beautiful." Right.  Obviously both true, but obviously hilarious as well.

The funny thing is that Canada is, for the most part, the same. But with better candy. And more colorful dollar bills. And an entirely different heathcare approach (neither here nor there). However, since my father is Canadian, and many of the first years of my parent's marriage was spent there, my mother has picked up many "Canadian" things to cook. Most of these are heavenly (just wait for the Christmas posts!).  So, in a word, think of this easy, healthy go-to soup as foreign... I mean flavorful.  Right.  Obviously both true.

This is one of my favorite weeknight (or even weeknight with guests) meals, and I have been craving it for weeks now. Because it's fall. And fall = soups. This recipe comes from a line of cookbooks called The Best of Bridge. And although it was originally called "Hamburger Soup," we now refer to it as "BoB Soup" (from Best of Bridge) because I no longer use ground beef in the making of it. :)


BoB soup is... warm - yes! tasty - yes! impressive - i happen to think 94% of all homemade soups are impressive, so yes! But the best part is, it's made of everyday ingredients. And somehow, you mix them all together and they equal just a warm bowl of goodness you will crave when the wind starts to turn a bit cold.

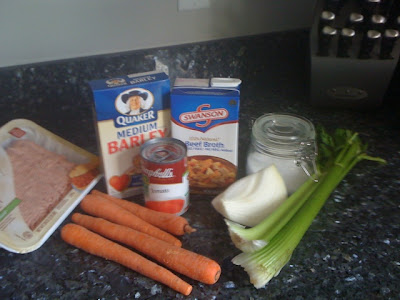
So, you compile the ingredients.

You may notice that I have forgotten diced tomatoes in this picture.  This is because, while I was at the store purchasing said "everyday items" I was on the phone with my mother.  Who told me that I was wrong and did not need diced tomatoes.  As it turns out, she was wrong.  As it further turns out, you can used your RoTel Diced Tomatoes with Cilantro in this recipe in a pinch.

You may also notice that instead of using a "medium sized onion" there is only 1/4 of an onion in this picture.  That is because the onion in question looked like this:


And THAT, friends, is an onion as large as my head.  Tell you what, I had a fun time at the farmer's market this weekend...

So just brown up your meat (I prefer turkey-burger) and onion (onion diced small).  And put a little salt or season salt in (because you should flavor every layer).  I used my fabulous cast iron pot to cook these in today, but my mother always just browned these two in a pan, and then transfered to a large stock pot.  So do what makes you happy.


And while the meat is browning and the onions are getting nice and tasty, chop up your carrots (I prefer "triangle" shape for this) and celery, so you have small bits of veggies. 

When your meat is sufficiently browned, drain the fat.  Now plop it back in a pot, and add everything else.  Your celery, carrots, diced tomatoes (no matter what your mother tells you), thyme, salt, bay leaf, water, pepper, barley, tomato soup (yup, just the concentrated stuff in the can) and beef broth. 


Obviously you could substitute another broth if you felt so inclined.  The original, Canadian, recipe calls for beef consume, which is not readily available where I live.  If you can find beef consume (it'll be near the canned soups, or perhaps the "broth" section), please use it.  I live in Kentucky, so I'm happy to find broth.  Either one entire box, or three 10.5 oz cans worth.

Also, if you are not a fan of barley, or just don't want to use it, feel free to use brown rice instead.  Or white rice if you feel so inclined.  I bought barley for this very occasion.  Not sure what else I'm going to do with it, but I love the texture in all kinds of soups, so I assume I'll do that.

Now bring the soup to a boil on medium heat, and place the lid kindof skewompas on top.  Now take it down to a slow simmer and boil away for at least an hour, preferably two.  But if it's longer, there are no worries.

slightly skewompas lid... in case it wasn't "english"

This soup is great re-heated, or even frozen for later.  But it is pretty darn great for right now.  mmm...  (Don't forget to take the bay leaf out...)


BoB (Hamburger) Soup
1 1/2 lb ground turkey (or ground beef)
1 medium onion, chopped
1 28oz can diced tomatoes
2 cups water
3 10.5 oz cans, or one 32oz box of beef broth
1 can tomato soup
4 carrots chopped fine
3 stalks of celery chopped fine
1/4 cup barley or brown rice
1/2 tsp thyme
Salt and Pepper (to taste)
1 bay leaf

Brown meat and onions
Drain well.
Combine all other ingredients in a large pot and simmer for 2 hours.
Take bay leaf out.
Serve.

Thursday, September 29, 2011

Penne and Cheese (because it's not macaroni)

I posted twice in one day!  Strange, yes, but since I had to pass along a recipe, and had changes to it, I thought I would go ahead and just write it out all together.  This is based on Kurt Dammlier's "World's Best" Macaroni and Cheese.

Hey, guys!  So, last night I made a wonderful mac and cheese - it really might rival my favorites.  And since only one of the three kinds of cheese is a new-addition to my shopping list, it was very economical as well. 

I didn't take pictures at the time, but do have a pic of the original recipe that I modified, so you can get a quick glimpse of the brilliance that is this show-stopping food.

picture courtesy of Martha Stewart.com


Good, huh?  YUP!  It'll be slightly different-looking than that, but you get the idea.

First: Make the Cheese Sauce.
Cheese sauce is like making gravy (as in biscuits and...), which makes me think I am going to fail at it.  Mostly because I have a track record of really good gravy, but only 1/2 cup of it, or a rational amount of sausage-flavored milk to go with the biscuits.  I'm working on this... we all have hangups in this world.  And I must say, even I could not mess this up.  Just pay attention and believe it's science.

melt 4 tbs butter in a heavy-bottomed pan.  I used a 12" pan and although 11" might work, any smaller than that and it would be cheesemageddon.  All over your kitchen.  when the butter is melted, add 1/3 cup flour and wisk it around to create tasty little morsels - and keep generally wisking while this cooks - for 2 minutes.  Trust me.  The full two minutes.

Then slowly add milk. I happen to drink 1%, so that's what I used... and, trust me, I was plenty happy.  So no need to run out and buy whole milk for this one.  Keep wisking for the most part and let it cook/wisk/thicken for another 10 minutes.  The whole ten.  You'd be amazed what happens between 9:30 and 10:00 - it ceases to become slightly-thick milk and turns into something more.  Now take it off the heat and put in 3 cups grated cheddar cheese (I love Sargento for cheese dishes, and since it's going to be highlighted, pay the extra ten cents and enjoy), as well as 1 cup cheddar jack (although I used "Mexican Blend" which also has two other cheeses, and i was happy happy happy).  Also add 1/2 tsp garlic salt and 1/2 tsp chipotle chili powder OR smoked paprika powder.

Now, assuming you want to go forward with this whole "pasta" thing and not just serve that sauce over veggies, eggs or your finger, let's move to the pasta:
In the mean-time, cook a box of penne pasta for about 2 minutes less than the manufacture's instructions (for me, that meant 9 minutes).  Drain and rinse to stop cooking process.

Put mostly-cooked pasta in a large bowl and add cheese sauce.  Stir to coat.

Add your delicious goo to a greased 9x13 pan that has been sprayed (or buttered if you're feeling decadent).  Now top with a light sprinkle of the chili powder or smoked paprika all over everything, 1/2 cup grated cheddar cheese, and 1/2 cup grated gruyere.  mmmm... the melty goodness of gruyere.  And now, just to add a little bit of crunch to the dish (I find it changes up the texture nicely), mix 3/4 of a cup of bread crumbs (ideally I'd use panko for the great texture, but today I just had italian style from progresso) with about 1 1/2 tbs melted butter, and spread over the top.

Pop in the oven for 20 minutes.  Let stand for 5 minutes, and serve to a grateful world.

Penne and Cheese

Cheese Sauce
4tbs butter
1/3 c flour
3 c milk
3 cups grated cheddar cheese
1 cup grated cheddar jack (or mexican blend) cheese
1/2 tsp garlic salt
1/2 tsp chipotle chili powder or smoked paprika

Melt butter, and add flour.  Wisk together and cook for 2 minutes (wisking occasionally) over medium heat.
Slowly add 3 cups of milk (keep wisking) and cook for 10 minutes.  Sauce should thicken, but not boil.
Take off heat and add the rest of the ingredients.

Penne and Cheese
1 lb penne pasta
1/2 c grated cheddar cheese
1/2 c grated gruyere cheese
1 tsp chipotle chili powder or smoked paprika
3/4 cup bread crumbs (wouldn't panko be nice?)
1 1/2 tsp butter

Cook pasta for 2 minutes less than "al dente."  Drain and rinse.
Combine cooked pasta and cheese sauce in a large bowl.
Transfer to 9x13 sprayed baking dish
Melt butter and add bread crumbs.  Stir to combine.
Top with remainder of ingredients and bake at 350 for 20 minutes.

Wait 5 minutes and serve.

Lizs Baked Brie

This weekend I baked all sorts of delightful goods, and thought to myself at the time "I am on a cooking roll, I will just photograph the next thing." Cinnamon rolls (two batches, because the first failed), chicken enchiladas and my favorite seasonal cake later... I still hadn't taken any pictures. WHY? Because I thought "there is more I am going to bake."  Well now I am baked out.

So I decided to bring to my Tuesday-party the easiest appetizer the world has ever thought of: baked brie. After all, it is wonderful cheese, plus fruit, plus yum equals... umm... yum? (math isn't my strong suit). 


If I could describe my cooking experience yesterday, I would quote one of my favorite redheads Anne Shirley and say "it's such a Jonah day." (that's just the kind of thing people don't say anymore, which makes me sad.)

Even shopping for the baked brie turned out to be a Jonah adventure... first the cheese-monger decided not to have the rounds of brie (although I have seen them on several occasions), and just the slices - fine, I'll muscle through. But, to top it off, neither of two stores had red (or even green) pepper jelly. (I know for a fact Harmon's, Super Target and Kroger all have them, however I live in a field surrounded by a Wal-Mart on both sides, and an Army base, which can be hit and miss.) Sufficient to say, it was a cooking adventure.  And it just goes to prove that my grandmother's saying "in a pinch" is useful.

(side-note, reading her recipes are fantastic.  "soak raisins in apple juice overnight.  in a pinch, microwave for 15-20 seconds."  she always gives you an alternate.)


Speaking of my grandmother, her daughter - My Fabulous Aunt Liz gave me this recipe. She is the source of many wonderful things in this life.  And, apparently, the person who made brie more readily available to me.  Just one of the many things I have to thank her for.  That and my love of boots, and wariness of liquid eyeliner (because it is a SKILL and not to be taken lightly).

What can you say about baked brie? It's easy. It's versatile. And it is delish. Perfect to bring to a formal coffee event with the military, or to bring out before your next casual dinner party.

Step the first, at least 3-4 hours before you want to make your brie, take the pre-made puff pastry out of the freezer. You will not see a lot of pre-made things on this blog, but puff pastry is one of them. Why? Because it's ridiculously time consuming to make (not like easy things like tortillas or pie dough). And, to add insult to injury, it doesn't taste any better than the kind you purchase in your local freezer section. So do yourself (and myself) a favor and give into this one. You'll be so happy you skipped that step.  Plus, Alton Brown told me not to bother with making my own.  So I don't.  Because Alton rarely lies to me (minus our disagreements with proofing yeast).

Now that you're ready to put this together, get out your cheese. mmm.... cheese. Brie is just so creamy and delicious, I could eat it all day. But then I wouldn't be able to fit into my pants, so sharing is preferred (not that I haven't eaten an entire wheel by myself at a Super Bowl party... whatever).

I prefer to cut the rind off of my brie. I know it's eatable, but I have a thing with textures, so it must go in my book.  If you have no texture issue, feel free to skip this step.


Now unfold and roll out your puff pastry (note, this is puff pastry, not phyllo dough. Although I have accidentally used the latter, I promise this tastes like 8 times better). Roll it out slightly. obviously, this depends on how much cheese you plan on putting in there. Today I had such a small square of cheese that I ended up over-rolling, and trimmed some off.

Add some jelly to the pastry right over where your cheese is going to go. As I said before, the preferred jelly is a red pepper jelly, and is generally quite easy to find (if you don't live in the middle of nowhere). However, I have also tried this with green pepper jelly, and with ginger marmalade. All of them are good options. Today I tried a new jam: Red Currant. It was lovely, and I may be making this switch again. This is especially good if someone you know is 100% heat-resistant for their food. The pepper jelly has a subtle after-punch, and this has a great not-to-sweet flavor I am happy I tried.


Now add the cheese (if you're like me and have to fib on your cheese shape, just create a square out of your triangles... see, looks like I did learn something in math class after all).

And, just for good measure, add some more jelly. Just because you're fancy like that. And because it is good.


Now, seal it up. Make sure there isn't a hole the cheese can creep out of anywhere, and put an egg-wash (yup, just brush an egg on top) over the top. If you feel so inclined, decorate the delicious little package with pecans. I've also decorated with craisins for a poka-dot look.

I generally twist opposite corners to make a little "package" shape, but a basic square works.  So long as it's sealed, you'll be happy.  And happiness is what cheese is all about.

Stick it in a 530 degree oven for 20-25 minutes, and share it with your friends when it comes out. Serve with fruit (we had apples, pears and craisins last night) and crackers.

Now sit back and relax, because in less than 5 minutes, you have created a gourmet appetizer. And now everyone will want to come to your parties. Congrats.
I meant to take a picture of this much earlier in the party... but you forget about it for a few minutes, and look what happens. 

Aunt Liz's Baked Brie

1 6 or 8 inch round of Brie (rind-trimming optional)
1 jar of Red Pepper Jelly (or reasonable facimilie)
1 sheet pre-made puff pastry (thawed)
eggwash
Pecans or Cranberries (optional)

Defrost pastry overnight.
Roll pastry so it's flat and round.
Put a layer of jam, cheese, and a second layer of jam in center of rolled pastry sheet
Encase the cheese completely with pastry.  Seal edges well.
Brush pastry with egg wash.  Decorate as needed.

Bake 350 for 20-25 minutes.  

Serve with crackers, grapes, crackers and pear slices.