Wednesday, August 31, 2011

Lemon Curd - a summer/fall hybrid

For the last month, I have been wishing for this weekend - praying for it.  Because this weekend, friends, is when I can come out of the closet and celebrate because it will be Autumn.  I can eat my candy corns in public, and wear my new cute boots around town without sideways glances because "August is the middle of summer."  Whatever.  After Labor Day starts the best season of the year.  And it is taking every ounce of fiber in my being to not post breads and soups and grilled cheese sandwiches.

Luckily for me, I found a cross-seasonal food that has both an awesome "summer" vibe to it, and the ability to span all through the glorious winter and the bitter cold months: Lemon Curd.  As a child, some of my fondest memories are sitting at our long oak table waiting for my mother to finish making lemon curd (probably for something important) so that I could have a bowl of it.  As an adult, I stick to slathering it on scones, crumpets or quick-breads.  It's wonderful in cakes, as a pie filling or just straight off of a spoon.  I have no doubt I'll be re-visiting lemon curd many many times here.

Making lemon curd takes a small amount of effort, but will pay off in spades compared to the bottled stuff.  You know what, that's only right if spades were made out of awesome, because it is just... so... I mean... I have no words.


First up, we are juicing some lemons.  I find if I microwave the lemon for 10 (ish) seconds before I go to juice it, I get more out.  Today I had two large lemons just sitting in my crisper, and luckily got an entire 1/2 cup out of them (and watch for seeds as you juice so you don't spend the next 3 minutes hunting them down and taking them out like some people I know did...).  And then zest one complete lemon, which will give you about two tablespoons, depending. 

Zesting, as a note, is just the yellow part (the white is bitter) and I love doing it on my microplane.  Love.  I have an actual zester as well, but it just takes so much more time.  If you're into zesting anything (fresh nutmeg, citrus zest, or finely-grated cheese) invest in a microplane greater.  You'll be so happy you did.

Placing all the ingredients in a 2-quart heavy sauce pan on medium-low, or a double-boiler over medium heat (I prefer the double-boiler because it gives me a little bit of wiggle room), start wisking.  Once it starts to heat up, add a piece of butter, and stir until melted.  Repeat until all the butter is in the lemon curd.  Keep wisking. 

The curd will lighten and thicken enough to hold trace-marks of a wisk.  When the first bubble appears you know you're done (it takes about 6 minutes, and for those science-people out there, it's about 160-170 degrees).

Transfer to another bowl and chill for 5-10 minutes (go ahead and stir that once for even cooling if you think of it), and place the plastic wrap directly onto the lemon curd to avoid a horrible film forming on the top.  (as Alton Brown would say, "That is not good eats") 

Refrigerate for at least an hour.  And ENJOY!  Use it in-between cakes, offer it as a treat to your children for doing their chores, or put it in a pie crust.

I made sure to lick my spatula.  I highly recommend it.

To get you started on an idea of what to do now that you have this tasty treat (and I'm telling you, this stuff goes on anything!) mix with whipping cream and use as a frosting, or filling for any pastry/dessert.

Using 3/4 of a cup of lemon curd, and one small box of freshly whipped cream (with powdered sugar and vanilla... and yes, you could skip out here and use Cool Whip, but why bother when you are SO CLOSE to perfection?), combing the two by adding 1/3 of the lemon curd to the whipping cream (mix), and then incorporate in two batches the whipping cream (now mixture) into the lemon curd.  Frost to your heart's content.


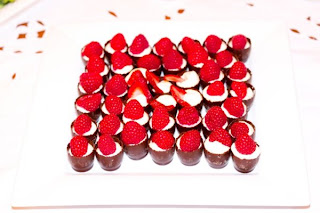
I ended up piping mine into chocolate cups, and it was Divine. 

Lemon Curd
Active time: 20 minutes  Start to finish: 1 hour 20 minutes

1/2 cup fresh lemon juice
2 teaspoons finely grated lemon zest
1/2 cup sugar
3 large eggs
3/4 cup butter, cut into bits

Wisk together juice, zest, sugar and eggs in a heavy saucepan or double boiler.  Wisk frequently.  Stir in butter piece by piece as the last one melts.  Continue to wisk until curd thickens, lightens slightly, and the wisk leaves traces - about 6 minutes.

Transfer to a bowl, allow to cool for 5-10 minutes (stirring once during this process) and cover with plastic wrap (make sure the wrap is touching the curd to avoid a film).  Refrigerate until cool. 

Enjoy.

Tuesday, August 23, 2011

Toffee Brown Butter Blondies (with a hint of Chocolate)


Well hello! My name is Sarah, and I cook. While explaining to my sister that my goal this year was to to compile my favorite recipes and "become the half-blood prince of cookbooks", I had an idea - so share some of my experiences with you, the world. A combination of family favorites I've marked-up and changed (you know, Half-Blood Prince Style!), to new surprises I am excited about, to probably (let's face it) an idea that doesn't work, I am excited to share with you.

Also, my sister (the blonde one) mentioned that I probably shouldn't refer to "blood" while cooking. Looks like I've made party-foul #1. Many more to come, I am sure. (and I'm sorry.)


Lately I've been noticing that all the recipes I've flagged to make have the words "Brown Butter" in the title. Having never used browned butter before, I knew I had to remedy this Post Haste so that I would stop being daunted by the idea. And knew I had to do it quickly so that I can get started on my ever-growing list of things to try.


As it turns out "browned butter" is apparently code for "how to turn a kitchen staple into heaven."

So, let's start with the butter (a VERY good place to start). On one hand, you don't want just melted butter. On the other, butter burns (it's about 45 seconds after "perfection"). So how to walk that tight-rope between burned and delish and end up on the right-side of done... Here are my helpful tips for browning butter: Heat pan with your stove around "medium," cut-up butter (you don't have to wait for it to be room temperature - which is the thing I love best about this) and melt - stirring continuously.

Butter will foam up. Although I've been told the "foam subsides," what that really means is that foam goes from "huge" to "frothy." This picture, for example, is post-foam-subsiding.


And the butter goes from "nothing is happening" to "this smells wonderful" in the blink of an eye. Watch for small brown flecks, and stir until it starts smelling like heaven: nutty sweetness category. Then take it off the burner and transfer containers so it stops (or slows down) cooking.

This is a little dark. I learned a valuable lesson called "make sure to take it off the heat." However, I also learned a valuable lesson called "even if it's not perfect, this still tastes like awesome."

And now, so important, WAIT UNTIL COOLED. You don't want to go around cooking your eggs with your hot butter-heaven, do you? Well... I mean you do... just not yet.


Once the butter is cooling start your batter by creaming together the sugar/butter combo, add way more vanilla than the recipe calls for and, yada yada yada... your house smells like heaven. Heaven. I can not stress this enough. A note on these: they will be gooey (like cookies) when you take them out, so look for done-ness by tester, and not how they look. They will also set-up (like cookies) so it'll get better.

Additionally, (and I am guilty guilty guilty...) wait until these are cooled to eat them. I promise, they get tastier as they cool. If you cut a nice steamy square even after waiting five (long) minutes, it tastes sweeter than the final (cooled) product.

And, my final cooking note... you've pretty much just made candy out of this butter. Which means that I suggest dishes to be on a "sooner" rather than "later" time-line. Or be prepared to scrub.


Brown Butter Toffee Blondies

Adapted from Martha Stewart


1 1/4 cups (2 1/2 sticks) butter

2 1/4 cups all-purpose flour

1 1/2 teaspoons baking powder

1 1/2 teaspoons salt

2 cups packed light-brown sugar

1/2 cup granulated sugar

3 large eggs

2 1/2 teaspoons pure vanilla extract
(or more! Who is looking?)
1 cup Heath Toffee bits


1. Preheat oven to 350 degrees. Spray or butter/flour a 9-by-13-inch baking pan.
2. In a saucepan over medium heat, cook the butter until it turns golden brown. Pour the delicious mixture into a seperate container so it does not continue to cook and make all of your hard work for naught.

3. In a small bowl whisk together flour, baking powder, and salt.

4. In a seperate, larger bowl, mix
cooled browned butter and both sugars with a wooden spoon until combined. Add eggs and beat, with hand mixer or using the paddle attachment on a stand mixer, on medium-high speed until the batter is light and fluffy, about 3 minutes. Add vanilla, and beat again to combine.
5. Add flour mixture, and toffee bits. Mix until thoroughly combined, and pour into prepared pan.

6. Bake until a cake tester inserted in the center comes out clean, 35 to 40 minutes (do not overbake). Transfer to a wire rack to cool completely before cutting into it.
The center will be gooey (much like baking cookies) when these come out of the oven, so decide on "done-ness" based on the cake tester, and not what it looks like - you don't want to over-bake these darlings.